sprinkle flour

Master the Art of Baking with These Rolling Pin Techniques

A rolling pin is a baker’s best friend when it comes to turning out perfect pies, cookies, pastries and more. While it may seem simple, there are actually several techniques that can help you get the most out of your rolling pin. Master these tricks and you’ll be rolling dough like a pro in no time!

rolling pins and patterned biscuits

Prep Your Dough Properly

Getting flawless results starts before you even pull out your rolling pin. Here are some key dough prep tips:

Use Chilled Dough

  • Chill pie, cookie, pastry and yeast dough thoroughly before rolling. Cold dough is firmer and rolls out more smoothly.
  • For pastry, freeze dough briefly until firm but not rock solid. This prevents overworking.
  • Let refrigerated dough sit out briefly until just pliable enough to roll without cracking.

Avoid Overmixing

  • Mix just until combined to avoid overworking dough. Overmixed dough becomes too elastic and tough.
  • Handle the dough gently when shaping. Don’t knead more than necessary.

Let Dough Rest

  • Give dough 10-30 minutes to relax and rehydrate after mixing. This prevents shrinking and springing back later on.
  • For yeast bread, allow the first rise before rolling if the recipe specifies.

Generously Flour

  • Flour your work surface, rolling pin and dough lightly but thoroughly to prevent sticking. Don’t be shy with flour!
  • Choose soft flours like cake or pastry flour for dusting to avoid toughness.

CheckTexture

  • Test the dough by gently poking it. Should indent slightly but bounce back. Add flour/water if too sticky or dry.
  • The dough shouldn’t feel overly sticky or stiff before rolling. Adjust consistency if needed.

Roll Out Dough Evenly

Applying just the right rolling technique gives you beautifully uniform dough thickness:

Roll from Center Outwards

  • Place the pin in the center of the dough and roll straight outwards, applying even pressure.
  • Turn the dough slightly and roll again from the center. Repeat, working your way around the dough.

Lift and Turn Dough

  • Periodically lift the dough and give it a quarter turn to ensure it isn’t sticking and thickness is even.
  • Add more flour beneath the dough as needed to prevent sticking.

Roll in One Direction

  • Roll away from you only. Don’t roll back and forth. This prevents the dough from stretching unevenly.
  • Rotate the dough a quarter turn after each roll to maintain shape.

Check Thickness

  • Periodically lift and feel the dough to ensure the thickness is uniform. Place a ruler underneath to check.
  • Adjust rolling pressure and flour dusting to achieve the desired thickness.

Fix Edge Rips

  • If the edges start to tear, lightly pinch them together to seal. Allow dough to rest for 5-10 minutes then continue rolling.

Maintain Shape

  • For circles, roll out from the center evenly in all directions. For rectangles, roll side to side.

Roll Specific Shapes

Adapting your technique to the shape you want achieves perfect results:

Circles

  • Pat dough into an even disk before rolling. Roll gently from the center outward.
  • Trim edges with a sharp knife or fluted cutter after rolling for clean circles.

Rectangles

  • Shape the dough into a square before rolling it to the desired length and width.
  • Roll evenly side to side, not outwards, keeping corners square and straight.
  • Cut into perfect rectangles with a bench scraper.

Ovals

  • Roll dough into a circle then shape it into an oval by rolling gently end over end.
  • For football shapes, roll dough ends tapering thinner than the center.

Logs

  • Shape dough into a rough log. Begin rolling in the center, applying more pressure at the ends to taper.
  • Cut the log into equal pieces with a bench scraper or sharp knife.

Lattice Strips

  • Cut dough into strips with a fluted pastry wheel. Roll strips evenly thin without tearing.

rolling pins and cute biscuits

Roll Specialty Doughs

Certain doughs require a special touch:

Keep Pastry Chilled

  • Work quickly with pastry dough to keep it cold for a tender, flaky texture.
  • Chill the pin and work surface so the dough doesn’t warm and soften.

Prevent Gluten Development in Pastry

  • Use only brief strokes rather than extensive rolling to avoid activating gluten.
  • Do not overwork or re-roll scraps to keep flaky layers intact.

Handle Phyllo Dough Gently

  • Work quickly with phyllo to avoid drying. Cover unused sheets with plastic wrap and then a towel.
  • Roll lightly to create tissue-thin layers without tearing the delicate dough.

Flatten Pizza Dough Thin

  • Use long, firm strokes to uniformly stretch and flatten pizza dough.
  • Start at the center and roll towards the edges, turning frequently.
  • Drape dough over your fist to stretch the edges thinner. Dimpling allows bubbles.

Roll Decoratively

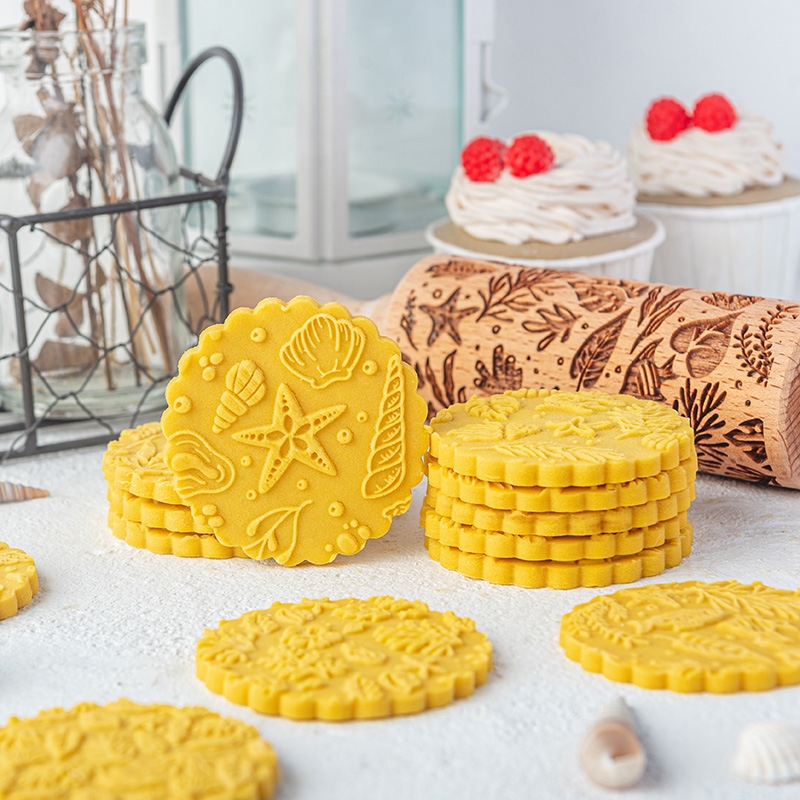
Get creative with your rolling pin! Stamped and engraved pins can make decorative dough:

Emboss Cookies

  • Chill the embossed rolling pin briefly, so the design imprints cleanly.
  • Roll chilled cookie dough 1⁄4 inch thick then cut out shapes.

Add Pretty Edges

  • For pies or pastries, roll over just the edges with a textured pin after rolling flat.
  • Crinkle edges by sealing the dough around the filling then pressing with a textured pin.

Stamp Fondant

  • Chill the fondant slightly to firm it up before rolling it out smoothly.
  • Press lightly with a stamped pin to imprint patterns. Emboss only once for clean imprints.

Conclusion

With the right prep, rolling technique and creativity, your rolling pin can help you consistently produce the perfect dough for any baking need.

Take care to handle the dough gently, roll it evenly in all directions, flatten the dough to the ideal thickness and use decorative pins for showstopping results.

In no time, you’ll be rolling dough like a confident baking pro!

Share:

Facebook
Twitter
Pinterest
LinkedIn

Leave a Reply

Your email address will not be published. Required fields are marked *

More Posts

candies

How To DIY Christmas Decorating Candy

As the holiday season approaches, the charm of Christmas decorating candy becomes irresistible. It’s not just about the sweetness; it’s about adding a personal touch

Related Posts

candies

How To DIY Christmas Decorating Candy

As the holiday season approaches, the charm of Christmas decorating candy becomes irresistible. It’s not just about the sweetness; it’s about adding a personal touch